
· 5 min read
Lutfi Ikbal Majid

"quill rich text editor"

I'm thinking of making a mini project, a shared notepad, but I found the default Textarea limited. So I decided to find a Rich Text Editor, with options like CKEditor, Slate Rich Text Editor and Quill Text Editor.

CKEditor is a commercial Rich Text Editor with a free license option, but I changed my mind. I think an open source one would be better, I first tried SlateJS:

import React, { useCallback, useMemo } from 'react'
import isHotkey from 'is-hotkey'
import { Editable, withReact, useSlate, Slate } from 'slate-react'
import {
Editor,
Transforms,
createEditor,
Descendant,
Element as SlateElement,
} from 'slate'
import { withHistory } from 'slate-history'

import { Button, Icon, Toolbar } from '../components'

const HOTKEYS = {
'mod+b': 'bold',
'mod+i': 'italic',
'mod+u': 'underline',
'mod+`': 'code',
}

const LIST_TYPES = ['numbered-list', 'bulleted-list']
const TEXT_ALIGN_TYPES = ['left', 'center', 'right', 'justify']

const RichTextExample = () => {
const renderElement = useCallback(props => <Element {...props} />, [])
const renderLeaf = useCallback(props => <Leaf {...props} />, [])
const editor = useMemo(() => withHistory(withReact(createEditor())), [])

return (
<Slate editor={editor} initialValue={initialValue}>
<Toolbar>
<MarkButton format="bold" icon="format_bold" />
<MarkButton format="italic" icon="format_italic" />
<MarkButton format="underline" icon="format_underlined" />
<MarkButton format="code" icon="code" />
<BlockButton format="heading-one" icon="looks_one" />
<BlockButton format="heading-two" icon="looks_two" />
<BlockButton format="block-quote" icon="format_quote" />
<BlockButton format="numbered-list" icon="format_list_numbered" />
<BlockButton format="bulleted-list" icon="format_list_bulleted" />
<BlockButton format="left" icon="format_align_left" />
<BlockButton format="center" icon="format_align_center" />
<BlockButton format="right" icon="format_align_right" />
<BlockButton format="justify" icon="format_align_justify" />
</Toolbar>
<Editable
renderElement={renderElement}
renderLeaf={renderLeaf}
placeholder="Enter some rich text…"
spellCheck
autoFocus
onKeyDown={event => {
for (const hotkey in HOTKEYS) {
if (isHotkey(hotkey, event as any)) {
event.preventDefault()
const mark = HOTKEYS[hotkey]
toggleMark(editor, mark)
}
}
}}
/>
</Slate>
)
}

const toggleBlock = (editor, format) => {
const isActive = isBlockActive(
editor,
format,
TEXT_ALIGN_TYPES.includes(format) ? 'align' : 'type'
)
const isList = LIST_TYPES.includes(format)

Transforms.unwrapNodes(editor, {
match: n =>
!Editor.isEditor(n) &&
SlateElement.isElement(n) &&
LIST_TYPES.includes(n.type) &&
!TEXT_ALIGN_TYPES.includes(format),
split: true,
})
let newProperties: Partial<SlateElement>
if (TEXT_ALIGN_TYPES.includes(format)) {
newProperties = {
align: isActive ? undefined : format,
}
} else {
newProperties = {
type: isActive ? 'paragraph' : isList ? 'list-item' : format,
}
}
Transforms.setNodes<SlateElement>(editor, newProperties)

if (!isActive && isList) {
const block = { type: format, children: [] }
Transforms.wrapNodes(editor, block)
}
}

const toggleMark = (editor, format) => {
const isActive = isMarkActive(editor, format)

if (isActive) {
Editor.removeMark(editor, format)
} else {
Editor.addMark(editor, format, true)
}
}

const isBlockActive = (editor, format, blockType = 'type') => {
const { selection } = editor
if (!selection) return false

const [match] = Array.from(
Editor.nodes(editor, {
at: Editor.unhangRange(editor, selection),
match: n =>
!Editor.isEditor(n) &&
SlateElement.isElement(n) &&
n[blockType] === format,
})
)

return !!match
}

const isMarkActive = (editor, format) => {
const marks = Editor.marks(editor)
return marks ? marks[format] === true : false
}

const Element = ({ attributes, children, element }) => {
const style = { textAlign: element.align }
switch (element.type) {
case 'block-quote':
return (
<blockquote style={style} {...attributes}>
{children}
</blockquote>
)
case 'bulleted-list':
return (
<ul style={style} {...attributes}>
{children}
</ul>
)
case 'heading-one':
return (
<h1 style={style} {...attributes}>
{children}
</h1>
)
case 'heading-two':
return (
<h2 style={style} {...attributes}>
{children}
</h2>
)
case 'list-item':
return (
<li style={style} {...attributes}>
{children}
</li>
)
case 'numbered-list':
return (
<ol style={style} {...attributes}>
{children}
</ol>
)
default:
return (
<p style={style} {...attributes}>
{children}
</p>
)
}
}

const Leaf = ({ attributes, children, leaf }) => {
if (leaf.bold) {
children = <strong>{children}</strong>
}

if (leaf.code) {
children = <code>{children}</code>
}

if (leaf.italic) {
children = <em>{children}</em>
}

if (leaf.underline) {
children = <u>{children}</u>
}

return <span {...attributes}>{children}</span>
}

const BlockButton = ({ format, icon }) => {
const editor = useSlate()
return (
<Button
active={isBlockActive(
editor,
format,
TEXT_ALIGN_TYPES.includes(format) ? 'align' : 'type'
)}
onMouseDown={event => {
event.preventDefault()
toggleBlock(editor, format)
}}
>
<Icon>{icon}</Icon>
</Button>
)
}

const MarkButton = ({ format, icon }) => {
const editor = useSlate()
return (
<Button
active={isMarkActive(editor, format)}
onMouseDown={event => {
event.preventDefault()
toggleMark(editor, format)
}}
>
<Icon>{icon}</Icon>
</Button>
)
}

const initialValue: Descendant[] = [
{
type: 'paragraph',
children: [
{ text: 'This is editable ' },
{ text: 'rich', bold: true },
{ text: ' text, ' },
{ text: 'much', italic: true },
{ text: ' better than a ' },
{ text: '<textarea>', code: true },
{ text: '!' },
],
},
{
type: 'paragraph',
children: [
{
text: "Since it's rich text, you can do things like turn a selection of text ",
},
{ text: 'bold', bold: true },
{
text: ', or add a semantically rendered block quote in the middle of the page, like this:',
},
],
},
{
type: 'block-quote',
children: [{ text: 'A wise quote.' }],
},
{
type: 'paragraph',
align: 'center',
children: [{ text: 'Try it out for yourself!' }],
},
]

export default RichTextExample

I didn't end up using slate js, because I couldn't find these components in its folder structure: import { Button, Icon, Toolbar } from '../components'

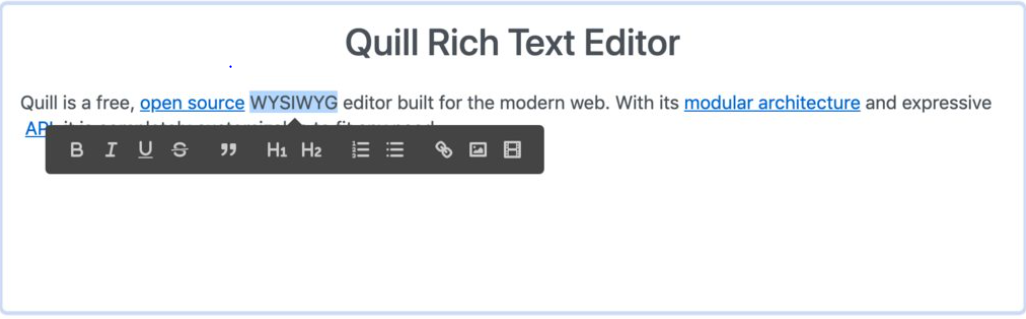
So I decided to try the third option, Quill. The result was good and easy to understand.

The installation is:

yarn add react-quill

For Next.js users, it needs to be dynamically imported, since the document object is not found during initial load.

import dynamic from 'next/dynamic';
import React, { LegacyRef, useEffect, useRef, useState } from 'react';
import type ReactQuill from 'react-quill';
import 'react-quill/dist/quill.snow.css';

interface IWrappedComponent extends React.ComponentProps<typeof ReactQuill> {
forwardedRef: LegacyRef<ReactQuill>
}

const ReactQuillBase = dynamic(
async () => {
const { default: RQ } = await import('react-quill')

function QuillJS({ forwardedRef, ...props }: IWrappedComponent) {
return <RQ ref={forwardedRef} {...props} />
}

return QuillJS
},
{
ssr: false,
},
)

Then I added a useState handler to save changes:

const [value, setValue] = useState('');
const quillRef = useRef<ReactQuill>(null)

also added modules for the toolbar, which will shown in the Header of Editor:

  const modules = useMemo(() => ({
toolbar: {
container: [
[{ header: '1' }, { header: '2' }, { header: [3, 4, 5, 6] }, { font: [] }],
[{ size: [] }],
[{ 'list': 'ordered' }, { 'list': 'bullet' }, { 'indent': '-1' }, { 'indent': '+1' }],
['bold', 'italic', 'underline', 'strike', 'blockquote'],
['link', 'image', 'video'],
['clean'],
['code-block']
],
handlers: {
image: imageHandler,
}
}
}), [])

And called the ReactQuill component:

<div>
<ReactQuillBase forwardedRef={quillRef}
className='w-full'
theme="snow"
value={value}
onChange={setValue}
modules={modules}
placeholder={"Write something awesome..."}
</div>

quill

How was it? It's good right?

Next we will add an image upload handler, using S3, as seen there is an image icon, but currently it cannot be used. Let's just install aws-sdk first with yarn add aws-sdk and configure the key

const AWS_S3_BUCKET = process.end.NEXT_PUBLIC_bucket;
const s3 = new AWS.S3({
region: "auto",
accessKeyId: process.env.NEXT_PUBLIC_accessKeyId,
secretAccessKey: process.env.NEXT_PUBLIC_secretAccessKey,
endpoint: process.env.NEXT_PUBLIC_S3_endpoint,
});

Then added an imageHandler function:

  const imageHandler = () => {

const editor = (quillRef as any)?.current.getEditor();
if (typeof document !== 'undefined') {
const input = document.createElement("input");
input.setAttribute("type", "file");
input.setAttribute("accept", "image/*");
input.click();

input.onchange = async () => {
const file = (input as any)?.files[0];
if (/^image\//.test(file.type)) {
console.log(file);
const key = crypto.randomBytes(5).toString('hex') + file.name;
const url = process.env.NEXT_PUBLIC_S3_endpoint;
const linkUrl = `${url}/${key}`;
const params: AWS.S3.Types.PutObjectRequest = {
Bucket: AWS_S3_BUCKET,
Key: key,
Body: file,
ContentType: file.type,
ACL: 'public-read',
};
const data: any = await s3.putObject(params).promise();
console.log(data)
if (data) {
editor.insertEmbed(editor.getSelection(), "image", linkUrl);
}
} else {
console.log('You could only upload images.');
}
};
}
}

quill2

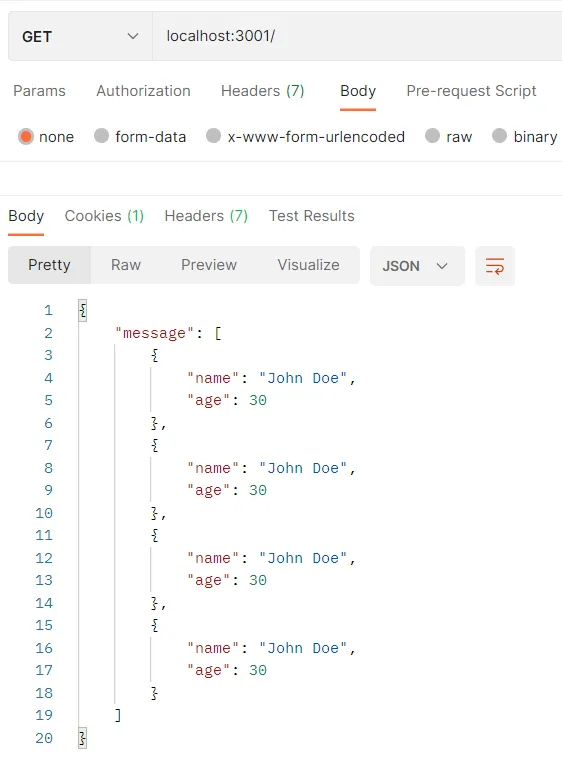
The question is, how to save to the database then display it again?

We can save it in string form with JSON.stringify(value), the string will looks like this:

const INITIAL = `<p>Hello</p><p>How are you?</p><p>are you okay?</p><p>Love you</p><p><br></p><p><img src=\"https://pub-821.r2.dev/91a215ee17picture.png\"></p>`

Then, we can load it using useEffect

  useEffect(() => {
setValue(INITIAL);
}, [])

· 6 min read
Lutfi Ikbal Majid
blockchain-smartcontract

Blockchain and smart contracts are two of the most innovative technologies of the 21st century, and have the potential to revolutionize a wide range of industries, from finance and healthcare to supply chain management and real estate.

Blockchain is a decentralized digital ledger that records transactions across a network of computers. It uses cryptography to secure and verify transactions and control the creation of new units of a particular cryptocurrency.

Smart contracts are self-executing contracts with the terms of the agreement written directly into the code. They run on a blockchain network and enable secure, transparent and tamper-proof contract execution without the need for intermediaries.

Together, blockchain and smart contracts have the potential to increase efficiency, reduce costs, and improve transparency and security across multiple industries. For example, in the financial industry, blockchain can be used to streamline cross-border payments and reduce the risk of fraud, while smart contracts can automate the execution of financial agreements.

In this blog post, we will learn to build simple Smart Contract API using truffle and Tomochain.

Setup Truffle

Before we continue, i hoped that you already have a metamask account, if not, you can see how to create it here create-new-wallet then add the tomochain testnet network add-tomochain-to-metamask and finally get the fund faucet, of the many networks, I think tomochain is the best in this case, on other networks it will usually give a little ethereum, 0.5 to 1 eth only. On tomochain we will get 15 TOMO. Get tomo fund here tomo-faucet

tomo-faucet

to get truffle, first we have to install it with npm or yarn globally

# npm
npm i -g truffle
# yarn
yarn global add truffle

there are two way to get started with truffle, truffle init or truffle unbox

truffle init
# or
truffle unbox

build-smart-contract-api

next is to install package truffle-hdwallet-provider

npm i truffle-hdwallet-provider
# or
yarn add truffle-hdwallet-provider

In this practice, we will use tomochain as a network blockchain, so we must add a network chain to the truffle configuration.

'use strict'
var HDWalletProvider = require("truffle-hdwallet-provider");
require('dotenv').config()

var mnemonic = process.env.MNEMONIC;

module.exports = {
compilers: {
solc: {
version: "^0.8.0"
}
},
networks: {
development: {
provider: () => new HDWalletProvider(
mnemonic,
"http://127.0.0.1:8545",
),
host: "127.0.0.1",
port: "8545",
network_id: "*", // Match any network id
},
tomotestnet: {
provider: () => new HDWalletProvider(
mnemonic,
"https://rpc.testnet.tomochain.com",
0,
true,
"m/44'/889'/0'/0/"
),
network_id: "89",
gas: 2000000,
gasPrice: 10000000000
},
tomomainnet: {
provider: () => new HDWalletProvider(
mnemonic,
"https://rpc.tomochain.com",
0,
true,
"m/44'/889'/0'/0/",
),
network_id: "88",
gas: 2000000,
gasPrice: 10000000000000,
}
}
};

change MNEMONIC env with your mnemonic wallet, more info here link

Create Smart Contract

We will create a smart contract inside folder contract with name JsonArray.sol. The contract has functions such as storeData() to adding Array data, getAllData() to getting all data, getData() to getting data by Id and also getArrayLength() to getting data length.

// SPDX-License-Identifier: MIT
pragma solidity >=0.4.22 <0.9.0;

contract JsonArray{
string[] public jsonDataArray;

function storeData(string memory _jsonData) public {
jsonDataArray.push(_jsonData);
}

function getAllData() public view returns (string[] memory) {
return jsonDataArray;
}

function getData(uint256 index) public view returns (string memory) {
return jsonDataArray[index];
}

function getArrayLength() public view returns (uint256) {
return jsonDataArray.length;
}
}

Until here, to check we have to compile it. by running the following command:

truffle compile

it will compile all Smart Contract inside folder contract.

next we will deploy the smart contract by creating a file in the migrations folder with the name 1_migration.js

const JsonArray = artifacts.require("JsonArray")

module.exports = function(deployer) {
deployer.deploy(JsonArray);
};

To deploy smart contracts on the tomochain testnet network, run the following command

truffle migrate --network tomotestnet

and then you will get the transactions receipt

$ truffle migrate --network tomotestnet

Compiling your contracts...
===========================
> Compiling .\contracts\Count.sol solc-bin. Attempt #1
> Compiling .\contracts\JsonArray.sol
> Compiling .\contracts\JsonString.sol
> Artifacts written to D:\Software-Development\blockchain\build\contracts
> Compiled successfully using:
- solc: 0.8.17+commit.8df45f5f.Emscripten.clang
⠦ Fetching solc version list from solc-bin. Attempt #1
⠏ Fetching solc version list from solc-bin. Attempt #1
Starting migrations...
======================
> Network name: 'tomotestnet'
> Network id: 89
> Block gas limit: 420000000 (0x1908b100)


1_migration.js
==============
⠴ Fetching solc version list from solc-bin. Attempt #1
Deploying 'JsonArray'
---------------------
> transaction hash: 0x7bbc9f3f5326ddef7756a796234d1b92c394197232ebe55c32650e3b1b61185e
> Blocks: 0 Seconds: 0lc-bin. Attempt #1
> contract address: 0x6f3c30D1151216BCEA768c0a35c99d9775d576bF
> block number: 34187627
> block timestamp: 1675181656
> account: 0x82aAb6bc1b906dbE7F4053aE86469318b958a139
> balance: 66.9123990505
> gas used: 784391 (0xbf807)
> gas price: 10 gwei
> value sent: 0 ETH
> total cost: 0.00784391 ETH

> Saving artifacts
-------------------------------------
> Total cost: 0.00784391 ETH

Summary
=======
> Total deployments: 1
> Final cost: 0.00784391 ETH


Done in 17.87s.

Since tomochain uses the forked ethereum network, 1 TOMO = 1 ETH but has a different value, i.e. 1 ETH = $1,587.44 but 1 TOMO = $0.381312. In the above transaction, the amount of gas fee we need to pay is 0.00784391 TOMO or $0.00299. Very cheap, right?

Calling Smart Contract function

To test your smart contract directly, you can use the online remix idea Remix-Eth-IDE. This time we will use web3.js, just create an api folder, and add the index.js file

const Web3 = require('web3')
require('dotenv').config()
const provider = new Web3.providers.HttpProvider('https://rpc.testnet.tomochain.com')
const web3 = new Web3(provider)

const contractAddress = "0x6f3c30D1151216BCEA768c0a35c99d9775d576bF";
const abi = [
{
"inputs": [
{
"internalType": "uint256",
"name": "",
"type": "uint256"
}
],
"name": "jsonDataArray",
"outputs": [
{
"internalType": "string",
"name": "",
"type": "string"
}
],
"stateMutability": "view",
"type": "function",
"constant": true
},
{
"inputs": [
{
"internalType": "string",
"name": "_jsonData",
"type": "string"
}
],
"name": "storeData",
"outputs": [],
"stateMutability": "nonpayable",
"type": "function"
},
{
"inputs": [],
"name": "getAllData",
"outputs": [
{
"internalType": "string[]",
"name": "",
"type": "string[]"
}
],
"stateMutability": "view",
"type": "function",
"constant": true
},
{
"inputs": [
{
"internalType": "uint256",
"name": "index",
"type": "uint256"
}
],
"name": "getData",
"outputs": [
{
"internalType": "string",
"name": "",
"type": "string"
}
],
"stateMutability": "view",
"type": "function",
"constant": true
},
{
"inputs": [],
"name": "getArrayLength",
"outputs": [
{
"internalType": "uint256",
"name": "",
"type": "uint256"
}
],
"stateMutability": "view",
"type": "function",
"constant": true
}
];

const privateKey = process.env.WALLET_PRIVATE_KEY;
// Unlock wallet by private key
const account = web3.eth.accounts.privateKeyToAccount(privateKey)
let coinbase = account.address
web3.eth.accounts.wallet.add(privateKey);
web3.eth.defaultAccount = coinbase
console.log(coinbase)

HttpProvider is the rpc network url of the chain to be used. contractAddress is the contract address obtained during deployment, see above. abi is json data from solidity compile, can be seen in the build/contracts/{smart contract name}.json folder. Private key can be seen in the metamask account, can read here Export-private-key coinbase is the address of our account (public key)

next is call function getAllData() and storeData() with dummy data using self execution function (()=>)() :D

const contract = new web3.eth.Contract(abi, contractAddress);
(async () => {
// Calling function getAllData()
await contract.methods.getAllData().call().then((v) => {
const parsedData = v.map(jsonString => JSON.parse(jsonString));
console.log(parsedData)
})

// Add data storeData()
const dataDummy = {
name: "John Doe",
age: 30
}

const gasAmount = await contract.methods.storeData(JSON.stringify(dataDummy)).estimateGas({ from: coinbase });

const tx = {
from: coinbase,
to: contractAddress,
gas: Number(gasAmount),
data: contract.methods.storeData(JSON.stringify(dataDummy)).encodeABI()
}

const signature = await web3.eth.accounts.signTransaction(tx, privateKey);
await web3.eth.sendSignedTransaction(signature.rawTransaction).on("receipt", (receipt) => {
// Data after sign storeData()
contract.methods.getAllData().call().then(v => {
console.log({ message: v, receipt });
});
})

})()

you will get response with receipt and state data before & after

$ node api/index.js
0x82aAb6bc1b906dbE7F4053aE86469318b958a139
[ { name: 'John Doe', age: 30 }, { name: 'John Doe', age: 30 } ]
{
message: [
'{"name":"John Doe","age":30}',
'{"name":"John Doe","age":30}'
],
receipt: {
blockHash: '0xdcf2c86d0bdba12e086876402ad6855cc80a782e9c06a55942a0b11e0371e6e8',
blockNumber: 34188640,
contractAddress: null,
cumulativeGasUsed: 51923,
from: '0x82aab6bc1b906dbe7f4053ae86469318b958a139',
gasUsed: 51923,
logs: [],
logsBloom: '0x00000000000000000000000000000000000000000000000000000000000000000000000000000000000000000000000000000000000000000000000000000000000000000000000000
00000000000000000000000000000000000000000000000000000000000000000000000000000000000000000000000000000000000000000000000000000000000000000000000000000000000000000000
00000000000000000000000000000000000000000000000000000000000000000000000000000000000000000000000000000000000000000000000000000000000000000000000000000000000000000000
00000000000000000000000000000000000000',
status: true,
to: '0x6f3c30d1151216bcea768c0a35c99d9775d576bf',
transactionHash: '0x320656767171ea4e2fb222c289afafc477cb87f2a710c59860c35d2d2ab94209',
transactionIndex: 1
}
}

Next is to create an API with ExpressJS. install express with the following command

npm install express --save
npm install body-parser
# or
yarn add express
yarn add body-parser

here is minimal express API

const express = require('express')
const app = express()
const port = 3001

app.get('/', (req, res) => {
res.send('Hello World!')
})

app.listen(port, () => {
console.log(`Example app listening on port ${port}`)
})

here is the full code for the rest API

const Web3 = require('web3')
const express = require('express')
var bodyParser = require('body-parser')
require('dotenv').config()
const app = express()
const port = 3001

app.use(bodyParser.json())


const provider = new Web3.providers.HttpProvider('https://rpc.testnet.tomochain.com')
const web3 = new Web3(provider)

const contractAddress = "0x6f3c30D1151216BCEA768c0a35c99d9775d576bF";
const abi = [
{
"inputs": [
{
"internalType": "uint256",
"name": "",
"type": "uint256"
}
],
"name": "jsonDataArray",
"outputs": [
{
"internalType": "string",
"name": "",
"type": "string"
}
],
"stateMutability": "view",
"type": "function",
"constant": true
},
{
"inputs": [
{
"internalType": "string",
"name": "_jsonData",
"type": "string"
}
],
"name": "storeData",
"outputs": [],
"stateMutability": "nonpayable",
"type": "function"
},
{
"inputs": [],
"name": "getAllData",
"outputs": [
{
"internalType": "string[]",
"name": "",
"type": "string[]"
}
],
"stateMutability": "view",
"type": "function",
"constant": true
},
{
"inputs": [
{
"internalType": "uint256",
"name": "index",
"type": "uint256"
}
],
"name": "getData",
"outputs": [
{
"internalType": "string",
"name": "",
"type": "string"
}
],
"stateMutability": "view",
"type": "function",
"constant": true
},
{
"inputs": [],
"name": "getArrayLength",
"outputs": [
{
"internalType": "uint256",
"name": "",
"type": "uint256"
}
],
"stateMutability": "view",
"type": "function",
"constant": true
}
];

const privateKey = process.env.WALLET_PRIVATE_KEY;
// Unlock wallet by private key
const account = web3.eth.accounts.privateKeyToAccount(privateKey)
let coinbase = account.address
web3.eth.accounts.wallet.add(privateKey);
web3.eth.defaultAccount = coinbase
console.log(coinbase)

const contract = new web3.eth.Contract(abi, contractAddress);


// call getAllData()
app.get('/', async (req, res) => {
await contract.methods.getAllData().call().then((v) => {
const parsedData = v.map(jsonString => JSON.parse(jsonString));

return res.json({ message: parsedData });
});
})

// call getData()
app.get('/:id', async (req, res) => {
await contract.methods.getData(req.params.id).call().then((v) => {
return res.json({ message: JSON.parse(v) });
});
})

app.post('/', async (req, res) => {
const { ...data } = req.body
const gasAmount = await contract.methods.storeData(JSON.stringify(data)).estimateGas({ from: coinbase });

const tx = {
from: coinbase,
to: contractAddress,
gas: Number(gasAmount),
data: contract.methods.storeData(JSON.stringify(data)).encodeABI()
}

const signature = await web3.eth.accounts.signTransaction(tx, privateKey);
await web3.eth.sendSignedTransaction(signature.rawTransaction).on("receipt", (receipt) => {
contract.methods.getAllData().call().then(v => {
return res.json({ message: v, receipt });
});
})

})


app.listen(port, () => {
console.log(`Example app listening on port ${port}`)
})

run the server with

node api/index.js

call getAllData()

get-all-data

call getData(id)

get-by-id

call storeData()

add-data

Hopefully my writing can help, Thank you

· 2 min read
ChatGPT
Lutfi Ikbal Majid

"learn programming"

Welcome to the fast lane of programming mastery! Learning to code doesn't have to be a slow and tedious process. With the right strategies, you can accelerate your progress and become a proficient programmer in no time.

Here are some tips to supercharge your learning:

1. Set Clear Goals

Define what you want to achieve with programming. Whether it's building a website, creating a mobile app, or diving into data science, having clear goals will give your learning a sense of purpose.

# Example Goal: Build a Personal Portfolio Website
goal = "Build a personal portfolio website showcasing my projects and skills."

2. Break it Down

Programming can be overwhelming, especially for beginners. Break down your goals into smaller, manageable tasks. Tackling one piece at a time will make the learning process more digestible.

// Example Task: Learn HTML and CSS
const tasks = [
"Learn HTML basics",
"Master CSS styling",
"Build a simple webpage",
];

3. Hands-On Coding

Theory is essential, but hands-on coding is where the real learning happens. Code every day, even if it's just for a short period. Practice makes perfect, and it solidifies your understanding.

# Example Daily Practice
def daily_coding_practice
puts "Code for at least 30 minutes every day!"
end

daily_coding_practice

4. Build Real Projects

Apply your knowledge by working on real projects. Building something tangible not only reinforces what you've learned but also provides a portfolio to showcase your skills to potential employers.

// Example Project: Task Manager App
public class TaskManager {
// Your project code goes here
}

5. Seek Feedback and Collaboration

Don't code in isolation. Share your code with others, seek feedback, and collaborate on projects. Learning from experienced programmers and receiving constructive criticism will catapult your skills.

# Example Collaboration
git clone https://github.com/your-username/awesome-project.git

6. Utilize Online Resources

Take advantage of the vast array of online resources. Platforms like Codecademy, freeCodeCamp, and Khan Academy offer interactive lessons. Leverage documentation and forums when you encounter challenges.

# Example Learning Platform
learning_platform = "freeCodeCamp"

7. Stay Curious and Keep Learning

Programming is a dynamic field, so staying curious is crucial. Embrace the joy of discovery, explore new technologies, and stay updated on industry trends.

// Example Curiosity
const stayCurious = () => {
console.log("Keep exploring and learning!");
};

stayCurious();

Embark on your programming journey with determination, curiosity, and a willingness to embrace challenges. Remember, the key to learning faster is consistency and a passion for the craft. Happy coding!